The Ancient Shrines are some of the most important gameplay elements in Breath of the Wild. There are numerous shrines found throughout Hyrule (120 in total, not counting the DLC shrines), with each of them serving as miniature dungeons full of logic puzzles and the occasional combat trial. They reward the player with Spirit Orbs and treasure chests full of useful items if they can successfully complete each challenge. They also act as practice runs, in a way, for what awaits Link inside the Divine Beasts and Hyrule Castle.
Some shrines are relatively simple, while others are quite difficult. In the easiest shrines, you’re given a fairly straightforward puzzle to solve, or if you have to do battle with a Guardian, it’s not a particularly powerful one. Most of these shrines are encountered fairly early on in the game if you head for the Dueling Peaks after finishing up on the Great Plateau. The more difficult shrines are accessed much later in the game after the player is more familiar and adept with the game mechanics.
10. Keo Ruug: Fateful Stars
You’ll find this shrine once you reach Korok Forest in the Lost Woods. On the main wall, you will see an array of constellations, with most of them appearing more than once. In front of you, you will see five rows of spaces with a constellation in front of each. If a constellation appears on the main wall three times, for example, then you put a Sheikah orb into the third spot on that constellation’s corresponding row. Easy peasy.
The only slightly difficult thing about this puzzle is figuring out whether the spaces are numbered one to five from back to front, or front to back.
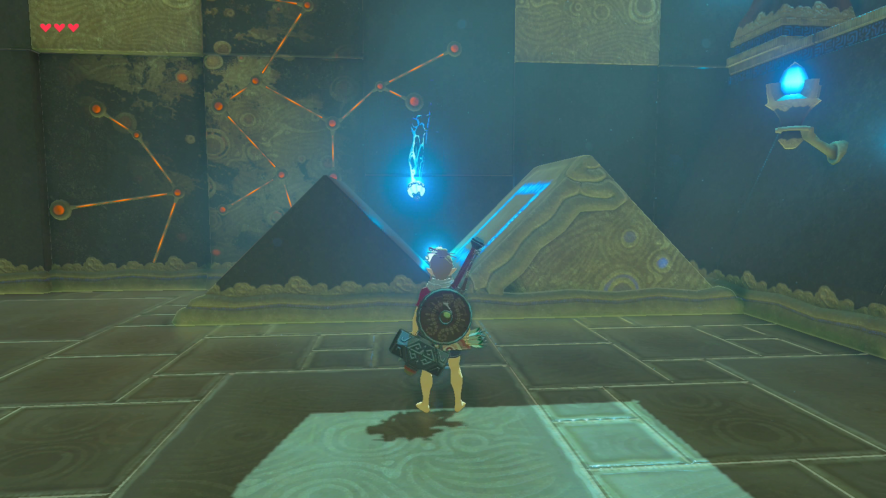
9. Shee Vaneer and Shee Venath: Twin Memories
These shrines need to be completed together, so it’s best to count them as one. The name of each shrine is a clue as to what you need to solve the puzzle inside, and these two Dueling Peaks shrines are a good example of that. You’ll also find a stone tablet in each of these two shrines advising you on the importance of remembering what you’ve seen. (If you like, you can draw a diagram of the orbs and pits or take a screenshot.)
It’s usually best to complete Shee Vaneer first, on the southern half of the Dueling Peaks, since the ascent is somewhat easier. From there, it’s just a quick paraglider ride down to Shee Venath on the opposite peak.
8. Wahgo Katta: Metal Connections
This shrine is good practice for using the Magnesis Rune. There are no Guardians lurking around, so all you have to do is maneuver the metal blocks, get yourself a treasure chest, and then put the metal ramp on top of the block stack to get to the completion point.
7. Oman Au: Magnesis Trial
This is the very first shrine in the game. The Old Man on the Great Plateau directs you to this shrine after the Sheikah Towers erupt from the ground. It is here that you acquire the Magnesis Rune, the first of the four Sheikah Slate runes.
The only boss here is the Guardian Scout, which you can dispatch with the giant steel block. Barring that, a few bashes with a sword (you probably will have at least a Traveler’s Sword in your inventory at this point) will dispatch it just as easily.
6. Jai Baij: Bomb Trial
This is likely to be the second shrine you encounter in the game, and it is here that you acquire the two Bomb Runes. The two pillars bouncing the sphere back and forth in the inner chamber should be obvious hints for what you need to do with the spherical bombs.
This shrine is located at the back of the Eastern Abbey ruins, which contains several wrecked Guardians. Proceed with caution as some of these Guardians are live. It’s best if you approach the abbey from the rear and climb over the back wall.
5. Keh Namut: Cryonis Trial
This Great Plateau shrine is usually either the third or fourth shrine the player will encounter, and it is here that you acquire the Cryonis Rune. For most players, the most difficult part about this shrine is getting here. If you haven’t given the Old Man the Spicy Meat and Seafood Fry in exchange for the Warm Doublet, climbing the mountain is a chilly and potentially hazardous exercise if you don’t have enough spicy food on hand.
Inside the shrine is a Guardian Scout that Link needs to dispatch. You can make a block of ice on the water, which will shield you from the Guardian’s view. But a few well-placed arrows or sword strikes will take this Guardian out. With the Guardian out of the way, all it takes is some strategic placement of ice blocks to open gates or help you climb to upper floors.
4. Tah Muhl: Passing the Flame
You find this shrine at the completion of the Landscape of a Stable shrine quest. Once you’ve used the painting in the Foothill Stable to figure out where the shrine is, the puzzle itself is a relatively simple one. All you need to do, basically, is set some ivy on fire, use Magnesis to grab the key so that you can open the locked door, smash or blow up a few more crates, and you’re home free. It does help, however, if you’ve practiced with the bow or if you’ve obtained some Fire Arrows or one of the Flameblades.
3. Ya Naga: Shatter the Heavens
This shrine, on the island in the middle of Lake Hylia, is good practice for using the two Bomb Runes. It does take some quick reflexes, though. As soon as you’ve detonated the round bomb that launches the stone block, you’ve got to detonate the cube bomb as soon as the stone block reaches the ceiling. And then you need to deploy another round bomb so you can ride the stone block to the upper floor. You’ve also got to deploy the paraglider and fly so that you can land on a stone platform with a treasure chest.
2. Owa Daim: Stasis Trial
One of the last of the Great Plateau shrines, Owa Daim is where you acquire the Stasis Rune. The giant round boulders rolling down the ramps, Indiana Jones-style, are what make this shrine somewhat more difficult than the other three Great Plateau shrines. If you are not careful, the boulders will crash into you — which could be fatal, depending on how many hearts you have left — or knock you off the platform and into the abyss. It helps if you pay attention to the rhythm of the falling boulders to determine how much time you have to run up the ramp before the next one falls.
1. Ta’lon Naeg’s Teaching
You’ll find this shrine up on the overlook above Kakariko Village. This is likely to be the first combat trial shrine the player encounters in the game. It is here that you get some coaching on four defense and attack moves: side hop, backflip, shield parry, and spin attack. In this shrine, you face a Guardian Scout with minimal weaponry. Use the moves the game teaches you in this shrine to defeat this lone enemy.
Erin Roll
Erin Roll is a freelance writer, editor, and all-around slinger of words for fun and/or profit.
Erin lives at the top floor of a haunted house in Montclair, NJ. She loves music, reading, hiking, and kayaking, and spends entirely too much of her free time playing video games.