In a previous piece, we talked about what may be the ten easiest Ancient Sheikah Shrines in Breath of the Wild: shrines that are easy enough for the most novice player, and yet interesting enough to keep experienced players entertained as well.
Now, we are going to the opposite end of the spectrum.
Every Breath of the Wild player, we may be certain, has a particular shrine that causes them to throw their controllers across the room with a wail of despair. Or just drop their head into their hands (but still with a wail of despair.) The Major Tests of Strength will test the mettle of even those players who are experts in combat. The three Labyrinth trials are easily a headache unto themselves.
Unlike my list of the easy shrines, I’m including shrine quests in this list, since the act of getting to these shrines can raise the difficulty factor quite a bit.
Remember, everyone, that this list is my own personal ranking, so you can take it with a grain of Rock Salt, as you wish.
Note: This list includes only those shrines found in the main game, as opposed to the DLC shrines.
10. Hila Rao: Drifting (Watch Out for the Flowers)
Come on, you didn’t think we’d put together a list of the hardest shrines without including Magda’s flower garden, did you? (doubtless, many players will feel that this belongs at the top of the list) You need to tiptoe through Magda’s tulips in order to reach this shrine. And if you step on even one flower…well, it’s not pretty.
The shrine puzzle itself isn’t the easiest, but it isn’t the hardest, either. The Cryonis, Stasis, and Bomb Runes will all help you out as you make your way through the shrine’s flooded rooms.
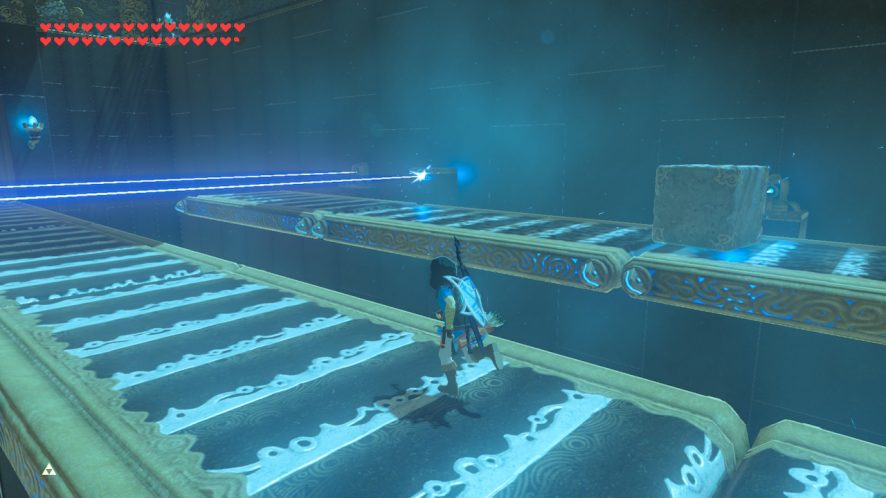
9. Jee Noh: On the Move
The first part of the shrine is simple enough. Fire an arrow at an Ancient Orb on a slow-moving conveyor belt to knock it into the ball pit. It is the second part of the shrine that will really test your mettle and reflexes. You have to take an Ancient Orb and run it up a considerably faster conveyor belt, all the while dodging laser beams. A good hand with the Stasis Rune and attention to which blocks of stone are coming down the opposite conveyor belt will help you out a lot.
8. Ze Kasho Apparatus
Motion control shrines appear to be a bone of contention for Zelda fans. Some people love them, while others despise them with a fiery passion. First you need to shift around a platform with moving spike plates so you can make your way across. Not too bad. Then you need to make your way across a long platform with laser beams shooting across it, which requires use of the Stasis Rune and maybe the Bomb Rune, and some arrows. If you want to get a hold of the treasure chest on the wall, that requires a good sense of timing and a good aim with your bow.
The last bit, which I think is the most challenging bit, involves getting the Ancient Orbs to roll onto the three pressure plates at the same time. A good strategy is to tilt your controllers very gently to the lower right — if you’re lucky, the orbs will roll right onto the plates. If you don’t get it on the first try, just keep trying and you’ll eventually get it.
7. Tho Kayu’s Blessing
Revealing the shrine itself in the Gerudo Desert isn’t too hard. It’s simply a matter of lighting four torches on four rocks set some distance apart in the Toruma Dunes.
Instead, the hard part is getting rid of the Molduga: the giant monstrous fish-like creature that makes its home beneath the desert sands. If you thought taking on a Hinox or a Stone Talus was hard, you’re in for a workout with this beast. Bring lots of high-powered arrows, and use the Bomb Rune to get the beast to emerge from the sands.
6. Toh Yahsa’s Blessing: Trial of Thunder
The most challenging part here is what you must do before even stepping foot in the shrine: the Trial of Thunder. This entails getting the four different-colored orbs onto their corresponding statues, all with a violent lightning storm raging around you. The rain, of course, makes it hard to climb. So you need a few different strategies to get the orbs either up onto the statues’ plateau, or down from atop the statues’ heads. Stasis will likely be your friend in this situation, and if you have a few Octorok balloons on you, they might come in handy as well.
5. Joloo Nah Apparatus: Test of Will
There are three motion-control cubes in this shrine: one with electric dynamos, one with wind jets, and one with torches. All of them must be rotated so that the dynamos/jets/torches are oriented just so. The most difficult part of Joloo Nah is the cube with the torches. The goal is to somehow get all the torches lit by rotating the cube to touch some other torches on the floor and walls. This is complicated, of course, by the presence of two gushing jets of water on either side of the cube.
It’s not impossible, but it may take some doing. If you have some fire arrows, that makes the process a little easier. Additionally, there is a pressure plate that can lower the height of one of the water jets. Before accessing this shrine, you need to complete [survive] the Gorons’ Test of Will challenge — which is doable if you have enough hearts, enough food, and some Flameproof Elixirs.
4. The Labyrinth Shrines: Tu Ka’loh, Qaza Tokki, and Dila Maag
I’m putting a rare three-way tie on this list for the three Labyrinth Shrines: Tu Ka’loh, on Lomei Labyrinth Island in the Akkala region; Qaza Tokki, in the North Lomei Labyrinth near the Tabantha Snowfield, and Dila Maag, in the South Lomei Labyrinth in the Wasteland region.
From what I’ve seen, a lot of fans have strong feelings (a lot of them negative) about these shrines. The hard part, naturally, is just being able to find your way through the labyrinths. There are a lot of dead ends, a lot of pools of Malice goo, and the occasional monster. You could, of course, try to make your way along the upper walls in a short cut. But on the other hand, the ground levels of the labyrinth are full of chests containing some really good weapons, treasures, and otherwise useful items, so trying to navigate the labyrinths on the ground is well worth it if you have the patience to do so.
3. Ketoh Wawai’s Blessing: Shrouded Shrine
Probably the most difficult aspect of the shrine is just being able to make your way through the darkness of the Thyphlo Ruins to get there. It is pitch dark in the forest to the north of the Lost Woods, and I’ll be honest — moving around in there is kind of terrifying. At least in the three Labyrinth shrines, you can see where you’re going.
And of course, there’s a Hinox. Your best strategy for wayfinding is to look at the bird statues. Whichever direction the bird’s beak is pointing in is where you need to go. I also highly recommend lighting the torches on the statues as you go along, since that will give you a point to double back to if you get lost or disoriented. If you have Daruk’s Protection, or the Radiant Set armor from the Gerudo Secret Club, that may make the going somewhat easier.
2. Shora Hah: Blue Flame
Getting to this shrine, on the crab-shaped rock formation in the middle of fiery Darunia Lake, takes some doing (not to mention a careful hand with the Stasis and/or Bomb runes). And that is only the beginning. You might have thought that getting the blue flame from the Sheikah furnaces to the two Ancient Tech Labs was hard work, rather like trying to complete a triathlon while doing the Olympic torch run. But those two are just a leisurely stroll compared to what you have to do here.
The challenges include trying to light torches on moving Sheikah platforms, using a bow and arrow, flying across the lava lake on updrafts, and trying to light a series of torches without causing a spray of water to put them out. To add to the fun, there are several Guardian Scouts that need dispatching, and a giant spiked metal ball that comes rolling down a ramp. The puzzles in this shrine are not impossible, mind you. But they do require a fair amount of patience and a steady hand. It’s also advisable to have plenty of arrows and maybe a few extra torches in your inventory.
1. Korgu Chideh’s Blessing: Stranded on Eventide
Good old Eventide Island — the shrine quest that is the stuff of nightmares.
You have to find the three Ancient Orbs located at different points on the island and get them to their altars. Easy, right? Wrong. When Link arrives on the island, he is immediately deprived of everything in his inventory: armor, clothes, weapons, materials, food. Basically, he’s back to where he was when he emerged from the Shrine of Resurrection. There are lots of monsters: Bokoblins, Moblins, and, yes, a Hinox. The region is prone to lightning storms. Oh, and as an added bonus, you can’t save your game. If you get killed, you get sent back to whatever the last save point was before you set foot on the island.
The smart player can identify what resources they have at their disposal and make effective use of them. There are some basic weapons to be found on the island, including a rusty shield, some old swords, and so on. As you take out enemies, you can upgrade to their weapons. There is food to be had, like Mighty Bananas, and different kinds of fish. The terrain can also be your friend in battle. When fighting the Hinox, my advice to you is to get uphill from it, and roll bombs downhill to get in some damage.
Erin Roll
Erin Roll is a freelance writer, editor, and all-around slinger of words for fun and/or profit.
Erin lives at the top floor of a haunted house in Montclair, NJ. She loves music, reading, hiking, and kayaking, and spends entirely too much of her free time playing video games.